ECTkeyboard - The progress bar and window positioning settings (51-79)
Progress bar and Window Positioning Settings
The progress bar located under the cells of the text matrix is intended to facilitate the process of character selection in it. When the user makes a selection, the progress bar starts to fill with a different color (from right to left by default), and displays the remaining time before the confirmation or the cancellation. The progress bar, like other elements of the program is fully customizable: its color, size and font style can be changed, as well as the direction of the bar filling.
The order of the options in the settings panel:
51. Progress bar select – Color of unfilled bar (RRGGBB) (all modes).
52. Progress bar select – Color of filled bar (RRGGBB) (all modes).
53. Progress bar select – Label font color (RRGGBB) (all modes).
54. Progress bar select - Name of font label (all modes).
55. Progress bar select - Size of font label (all modes).
56. Progress bar select - Bar direction (0, 1, 2, 3) (all modes).
57. Progress bar reject – Color of unfilled bar (RRGGBB) (all modes).
58. Progress bar reject – Color of filled bar (RRGGBB) (all modes).
59. Progress bar reject – Color of filled bar (RRGGBB) (all modes).
60. Progress bar reject - Name of font label (all modes).
61. Progress bar reject - Size of font label (all modes).
62. Progress bar reject - Bar direction (0, 1, 2, 3) (all modes).
The settings 51 to 56 are progress bar settings when a row, a column, or a cell are selected. The settings 57 to 62 are the same settings but for the cancellation of a selection. The unfilled bar color is determined by the hue fill of the entire progress bar, before the selection of the desired character by the user, or only by the hue fill of the inactive area of the progress bar once the selection is made. The color of the filled bar is related to the shade of the filling bar during the selection.
To make the comprehension of these settings simple, let’s consider an example. The user controls the program through closing his eyes for some time. Assume the minimum hold time setting (37) is set to a value of 1000, and the maximum hold time (38) is 1500. This means that in order to select the desired row or column , and then a character in it, the user must keep his eyes closed for longer than a second , but no more than 1,5 seconds (otherwise the selection will be canceled). Let’s say the color of the unfilled bar is silver (# C0C0C0) and the color of the filled bar - gray- green (# 008080), and for the cancellation - gray (# 808080) and dark blue (# 000080).
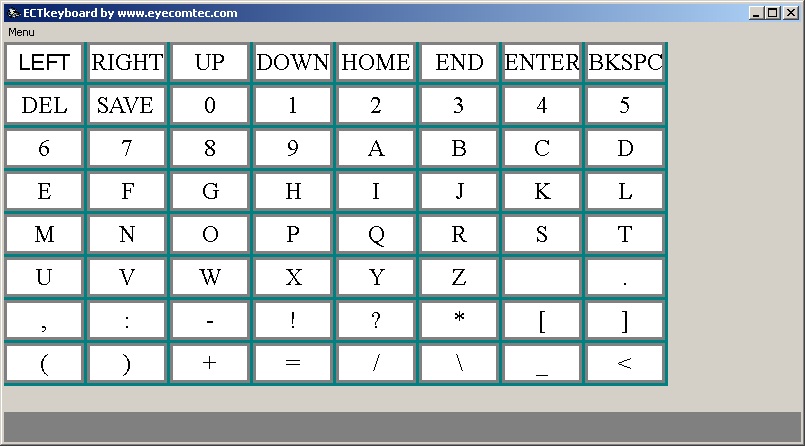
When the user does not make any selections, the progress bar is completely gray and does not display the selection countdown (see Fig. 39).
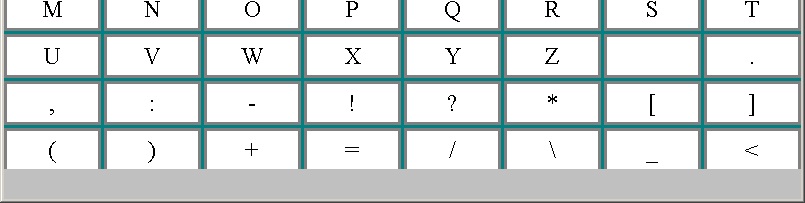 (Fig. 39. In the absence of action the progress bar is inactive)
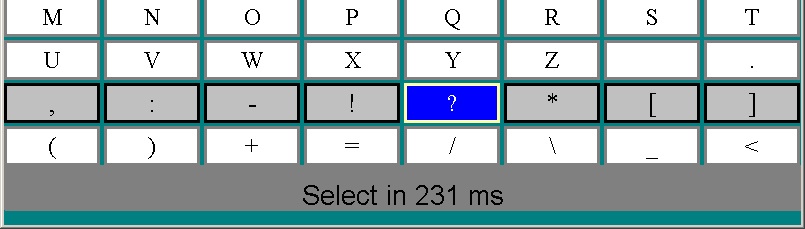
When the user by closing his eyes selects a row, a column, or a character, the progress bar changes its color completely (in the chosen example – it becomes gray- green), and starts the countdown. The bar displays the remaining time until the completion of the selection in milliseconds (see Fig. 34). In this case, the bar strip is filled from right to left with the inactive color (in this example - silver) (see Fig. 40).
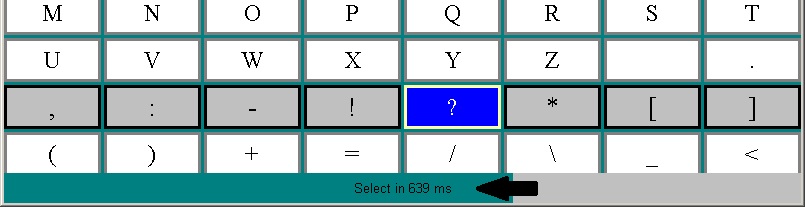 (Fig. 40. The progress bar starts getting filled when a character is selected)
If a user keeps his eyes closed longer than the minimum hold time (1 second in this example), then the countdown reaches 0 and the progress bar gets completely filled with inactive color, after what begins the countdown for user’s actions cancellation. The progress bar becomes dark blue (selected active color when deselecting), and gets filled with gray (selected inactive color when deselecting). The progress bar also displays the remaining time - if the user doesn’t make a selection before the end of the countdown (do not open the eyes ), then the action will be canceled (see Fig. 41).
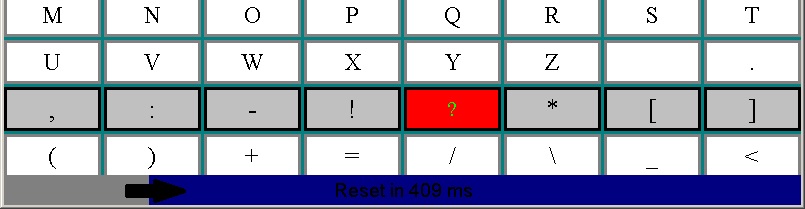 (Fig. 41. At long hold the deselection mode is activated)
The color of the text over the bar strip is recommended to be contrasting with the color of both the active and inactive bar. For example it can be dark color text on dim and bright color progress bar. The text font name, allows setting the text font style and size, or increasing and decreasing it (see Fig. 42).
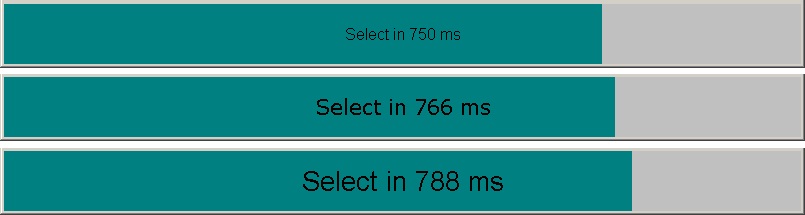 (Fig. 42. Various text font types and sizes in the progress bar)
The ability to separately customize the appearance of the progress bar in the input selection and cancellation mode allows a convenient use of the program and to use different color options (for example, to use softer shades in the selection mode and more contrasting shades with enlarged fonts in the cancellation mode).
When working with a progress bar it is possible to adjust separately for each case the direction of its filling (see Fig. 43). This can be done through the settings BarDirection1 (56) - responsible for the direction of the filling in the input mode; BarDirection1 (62) - the direction of the bar filling in the cancellation mode. The following values are available:
- 0 - Filling from right to left;
- 1 - Filling from left to right;
- 2 - Filling top down;
- 3 - Filling bottom-up.
 (Fig. 43. Various progress bar fillings)
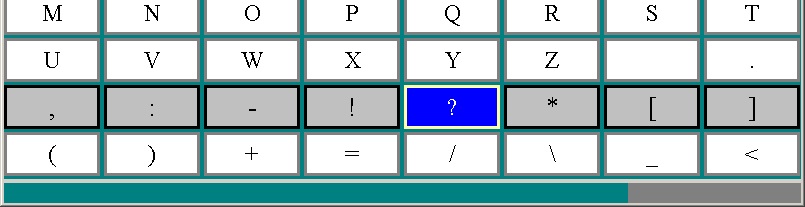
63. Progress bar – labeling type ( all modes ). As shown in the explanations for this setting, the program has three different progress bar operation modes. If the variable value is equal to 0, the progress bar will not contain any text. The color filling will be the only indicator of selection. If the variable is equal to 1, the progress bar displays the selection delay in milliseconds, and if the value is 2 the remaining time in percentages (see Fig. 44).
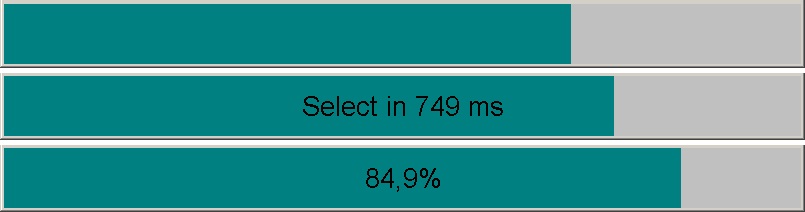 (Fig. 44. Different versions of progress bar text notifications)
64. Extended hold time (modes 0, 1, 1B, 2, 2B, 3). Different situations may arise when working with the program. For example, the patient is asleep or keeps his eyes closed for too long, the lighting conditions in the room changed and the image caption program cannot determine whether user's eyes are open or closed. In the case of any long retention of the selection the program controls the time.
65. Command code for extended hold time (all modes). In case the retention time exceeds the time specified in the setting n° 64 an additional command can be used (for example, triggers an automatic calibration of the camera or an external audio signal to call the medical stuff).
66. Adjust button size dimensions to fill the form (all modes); This variable can take two values - 0 and 1. If SetButtonSize is equal to 1 the automatic scaling of all text fields of the matrix is enabled, to make them fits within the limits of the window. This is useful in cases when a quick change of the size of the matrix of letters is necessary, removing the needs to manually select the width and the height of the cells. Automatic scaling is enabled by default, when the program is launched for the first time.
If the value of SetButtonSize is equal to 0, the size of the buttons vertically and horizontally, as well as the distance between them and the width of the button frame is clearly within the defined values (see Fig. 45).
 (Fig. 45. Text matrix with disabled Automatic Scaling)
67. Height of progress bar (all modes). Another setting of the progress bar that can be changed is its height in pixels. The height of the progress bar should be increased when it is set to be filling bottom up or top down and if the resolution of the monitor allows it or in cases where the patient needs a large text to be displayed in the progress bar (see Fig. 46). Conversely, for low resolution monitors or small size program windows it is recommended to reduce the height of the progress bar. In this case, the text font on the progress bar can be reduced or even disabled (see Fig. 47).
 (Fig. 46. Program window with an enlarged progress bar and vertical filling color)
 (Fig. 47. Program window with a reduced progress bar and horizontal filling color)
The position and size of the windows can also be changed in the settings panel. 4 parameters are to be set individually for the main form and the output form: the width and the height in pixels, the margin in pixels vertically and horizontally from the upper left corner of the screen.
The order of the options in the settings panel:
68. Main form – Left margin positioning (all modes).
69. Main form – Top margin positioning (all modes).
70. Main form – Width (all modes).
71. Main form – Height (all modes).
72. Output-form – Left margin positioning (all modes).
73. Output-form – Top margin positioning (all modes).
74. Output-form – Width (all modes).
75. Output-form – Height (all modes).
Working in coordinate mode by holding the cursor is different from other operation modes of the program. In coordinate mode, the holding operation is carried with the cursor keys, each pressing moves the special pointer in the desired direction - to the right, left, up or down (see Fig. 48).
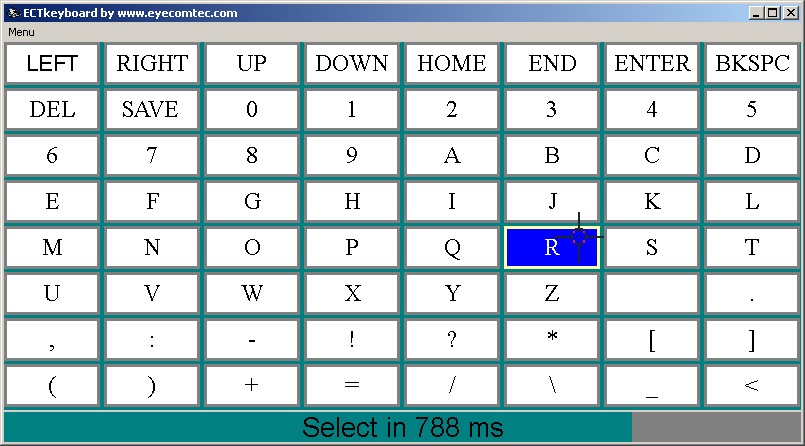 (Fig. 48. Using the coordinate mode with holding the cursor)
The pointer shift size vertically and horizontally can be changed separately. The greater the shift is the faster will the pointer move from one cell to another. Lower the shift is, the higher is the accuracy of the program.
76. Size of row shift in pixels (vertical step) (mode 4).
77. Size of column shift in pixels (horizontal step) (mode 4).
78. Disable the cursor at empty border cells (mode 4). This option allows setting the outside text field limits of the matrix, and disabling the cursor from moving outside of them. The value 0 corresponds to the visible region of the matrix. If the value FieldEmptyBorderCells is increased, it will become possible to move the cursor outside of the set keyboard limits - this function is useful for large pointers or with irregular shape. If FieldEmptyBorderCells value is negative, the invisible outer keyboard boundary will be reduced by this value, preventing the center of the pointer moving beyond the defined limits.
79. Field separator.
Automatic settings at startup (80-81)
At startup the program can automatically activate the user-defined selector mode, or hide if necessary the frames of the main form of the program.
80. Current selector mode. This setting allows you to launch ECTkeyboard and automatically choose the selector mode used before the previous closing of the program. This eliminates the need to choose the mode for using the main menu commands or keyboard shortcuts on each start.
81. Display form borders. This item of settings panel allows running ECTkeyboard with hidden or displayed frames and header of the main window - depending on whether they were hidden or displayed in the previous session. Thus, once it is enough to customize once the appearance of the program window, and it will be restored at the next session.
82. File to save current work to. When a user closes the program but has unfinished text, the data will automatically save to a file and be loaded the next time ETCkeyboard runs. This setting allows the user to save the file under a user specified name.
83. Auto save time interval. This setting allows the user to change the time between each auto-save in seconds. Upon saving, the program will create a time stamped file, and will create a new file everytime the program auto-saves.
84. Active language file. This setting allows the user to select and change the language in which the program will operate. This can be done by performing the following:
ECTkeyboard → Menu → Localisation → Set Language File
To return to the language default, English, perform the following:
ECTkeyboard → Menu → Localisation → Reset to Default
85. Progress bar select sound. This setting allows the user to select a sound notification to be played when confirming a character selection, in addition to the progress bar.
86. Progress bar reject sound. This setting allows the user to select a sound notification to be played when rejecting a character selection, in addition to the progress bar.